


Reports
This section describes the Reports features.
In Report, The teacher can register reports and instruct students to submit reports. Or, they can notify the reception and instruct to resubmit report, and furthermore they can add memo on each subject of reports.
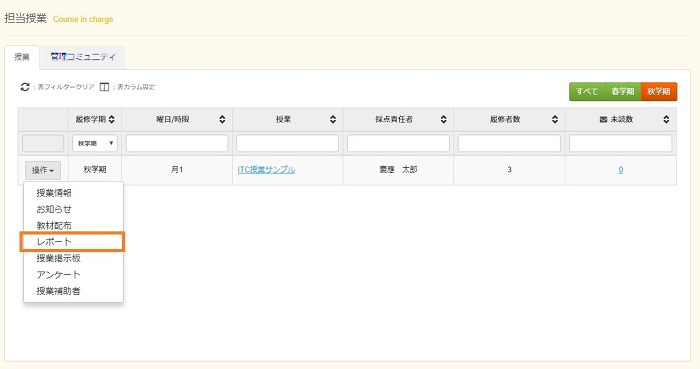
Transition to report registration.
Select report from [Operation] of the object class.Or, select class name and select [Reports] tab.
Reports Features
- Registering Reports
- Modifying Reports
- Deleting Reports
- Checking the Submit Status
- Verifying Submitted Reports
- Notices to Course Students
- Import Reports(s)
- Send Mail
a. Registering Reports
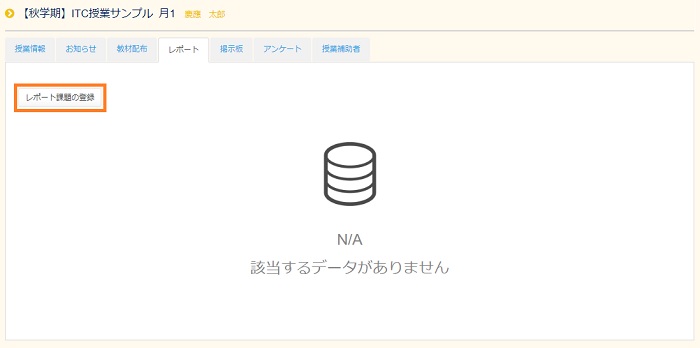
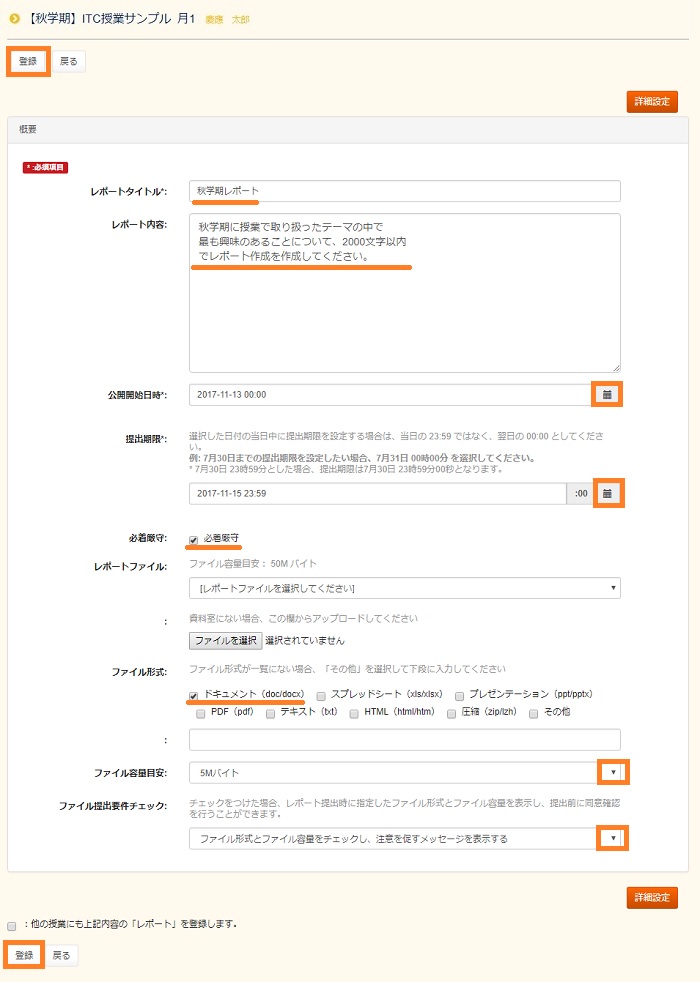
This paragraph is the explanation to register the report of subject. For registering the report, click on the [Add Report]. If the report is not registered, “N/A Data not available.” is displayed. Please look here for advanced setting.
- [Report Title]
- Enter a title for the report.
- [Report Content]
- You can add an overview of the report, as well as other details such as notes.
- [Starting date]
- Select the date to release the report to students.
- [Submission deadline]
- Select a due date from the calender.
Please do not specify settings between 5 and 6 every morning. (This time is reserved for regular maintenance.)
If you accept report submissions during July 31, please set the deadline on "August 1 00:00" not "July 31 23:59".
e.g. For setup "July 31 23:59", its deadline is "July 31 23:59:00". - [Strict deadline]
- Select this option to forbid students from submitting their report after the due date. (This does not apply to instances when you ask a student to re-submit their report.)
- [Report Files]
- You can make data available for course students to use for preparing their reports. You can upload files stored in Reference Materials, or click [Browse] and directly upload the data when needed.
- [File Format]
- It is the setting of file formats when students submit the reports. That ways are the check on file formats that you want to use, or input the other file format in the form.
In addition, this file format is just only for students submit the reports, students can submit the other file formats of the reports.
To check the set file Format, enable [Check the file type and display the dialogue] in the check options for the file submission requirements.- It is recommended for the Excel, Word and PDF files to be less than 5MB.
- If you attach photos please select the files to be less than 5MB.
- If the files like videos and audio are more than 30 MB, please use box, Google drive, etc.
- [File size limit]
- You can specify the maximum file size for reports that are submitted.
Remember, this is merely the size you would prefer students to use. Students can still submit reports that exceed the size you specify here.
For making students check the file size before submitting the reports, check [File submission requirement check] and select [Check the file size and display the dialogue]. - [File submission requirement check]
- A user can check the specified file type and file size when submitting a report. If the file type or file size differs from the specified one, a confirmation message can be displayed to confirm whether or not to actually submit the report. The following 4 setting options are available.
- Do not check the file type or file size
- Check the file type and display an alarm message
- Check the file size and display an alarm message
- Check both file type and file size, and display an alarm message
- Check the file format and restrict the submission
- Check the file size and restrict the submission
- Check the file format and size, and restrict the submission
- [You can register a report with the above contents for other classes.]
- If you are in charge of multiple classes, you can register the same report for other classes by entering a check to select the class.
When you are finished, click [Register].
When the window to confirm registration appears, verify that the settings are correct, and then click [Register].
Email notification is available during registration. See the email notification feature for details.
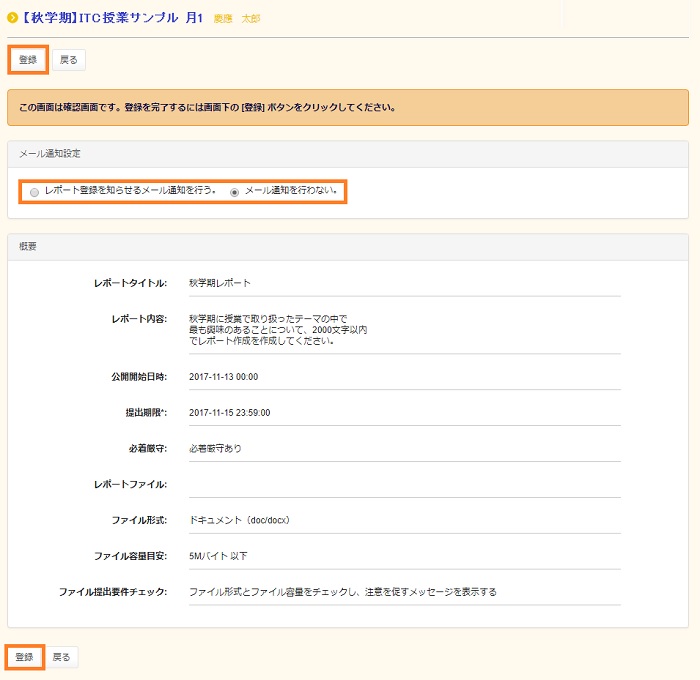
The Class-Related Home page then appears. Finally, confirm that the information in the Reports feature reflects the information you entered.
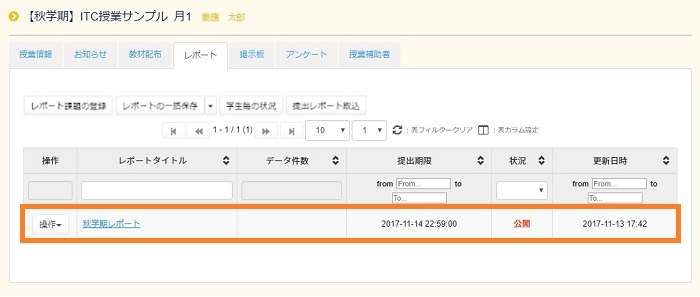
To verify the details of the report you registered, click the text in the [Report Title] column.
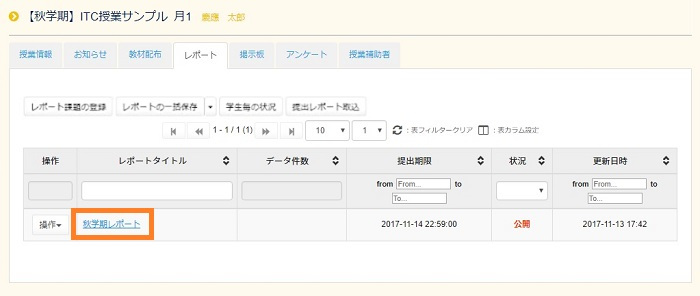
The report details page appears.
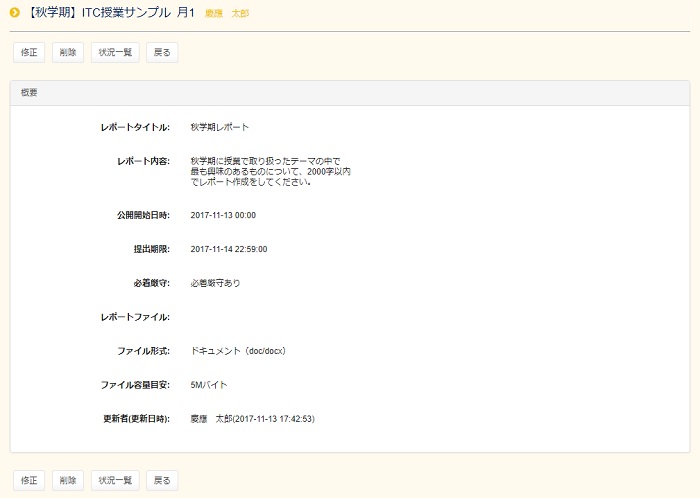
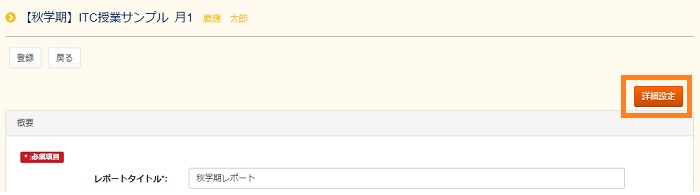
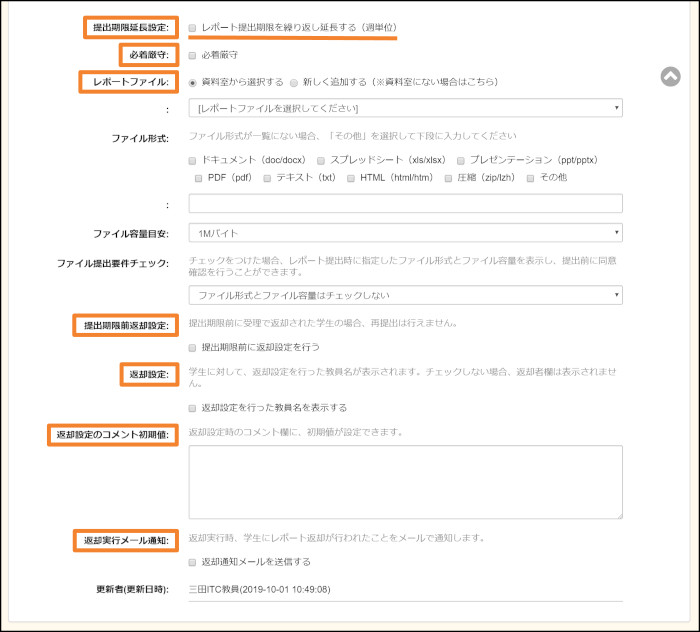
Advanced settings for Report registration
If you want to set details, press the advanced setting button on the right side of the report registration screen.Read the following for setting details.
- [Report Limit Auto Extension]
- You can set repeatedly extend of the deadline for submission of reports in weekly units by entering a check in this box.
- [Repeat interval*] This item is displayed when [Report Limit Auto Extension] has been checked.
- You can set the repetition period as weekly, alternate weeks, every 3 weeks, and every 4 weeks.
- [Repeat end date and time*] This item is displayed when [Setting extend submission deadline] has been checked.
- You can set the date and time when the repetition period ends.
- [Submission deadline pre-return setting]
- Enable set the report status feature before limit. In the case of a faculty member having marked a report "Received" and returned it to a student before the submission deadline, the student may not resubmit it.
- [Return setting]
- Faculty member name who set return is displayed to students.When it is not checked, the returner box will be blank.
- [Default comment value for returning report]
- This form is possible to set up default value of comment for returning report.
- [Return executed e-mail notification]
- When you return a report, the student is notified by e-mail to the address registered in class support that it has been returned.
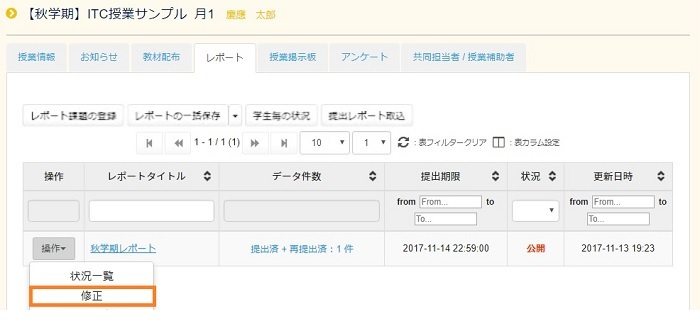
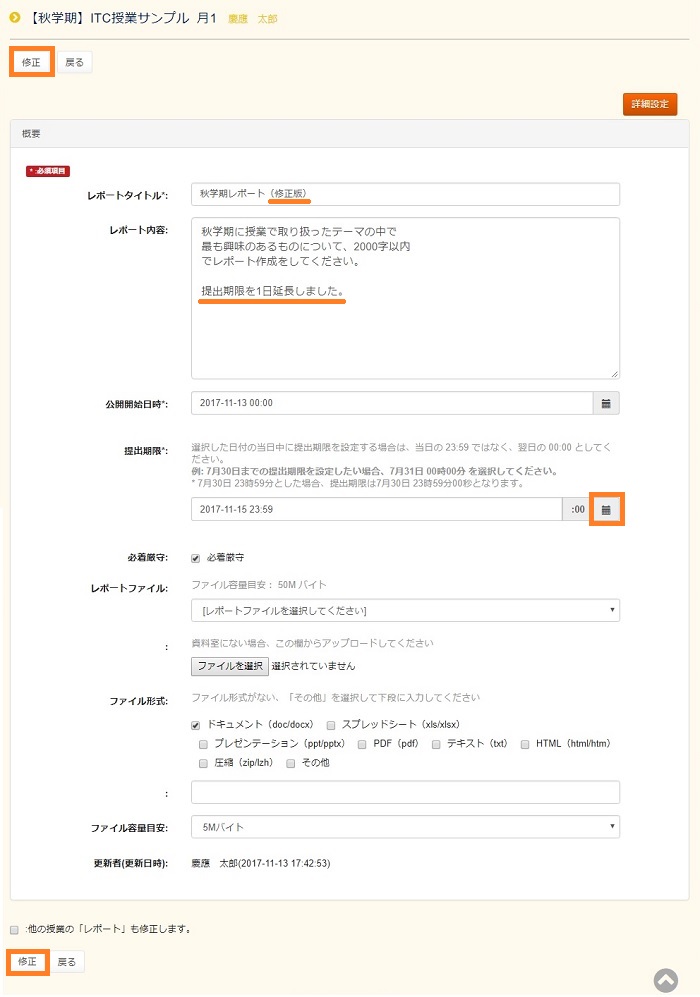
b. Modifying Reports
For modifing the reports, click [Operation] of report which you want, select [Modify Reports] in pull down list.(Or, click [Report] tab, and click the report directly. Click [Modify] button in the top of left of windows.
When you are finished, click [Modify].
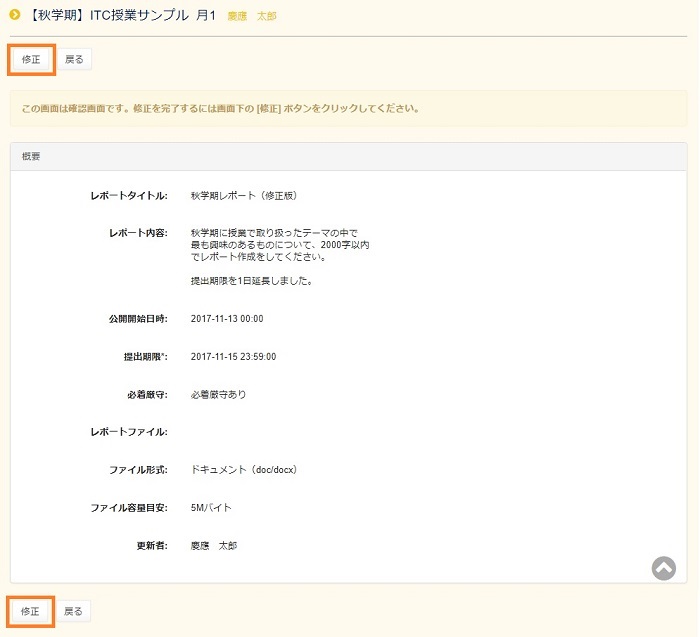
When the window to confirm the changes appears, verify that the settings are correct, and then click [Modify].
Email notification is available during registration. See the email notification feature for details.
The Class-Related Home page appears. Finally, confirm that the changes you made are reflected in the report settings.
c. Deleting Reports
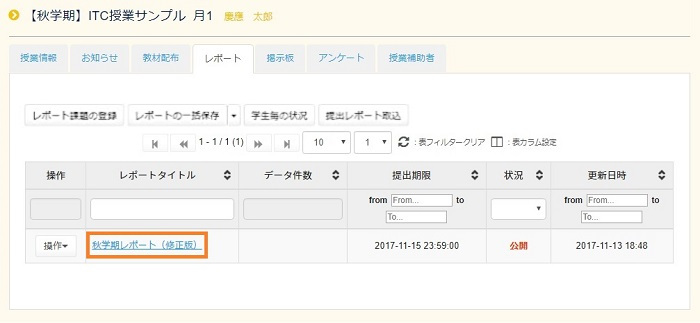
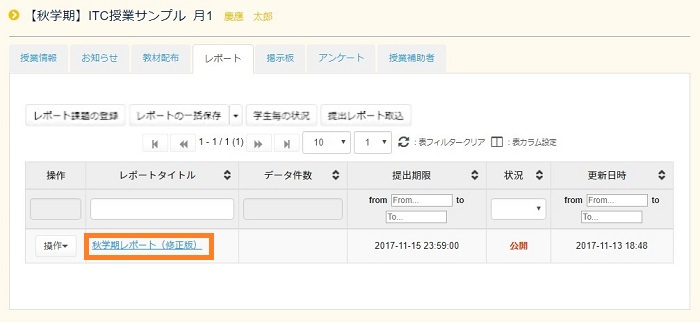
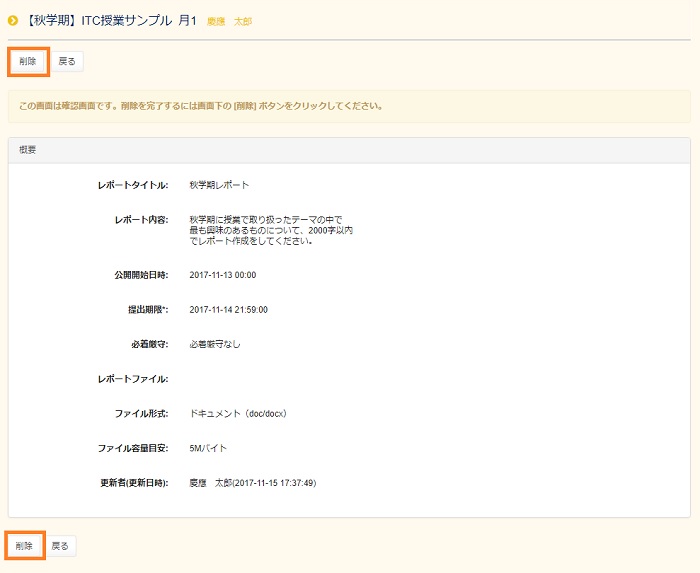
Click the title of a report to delete.
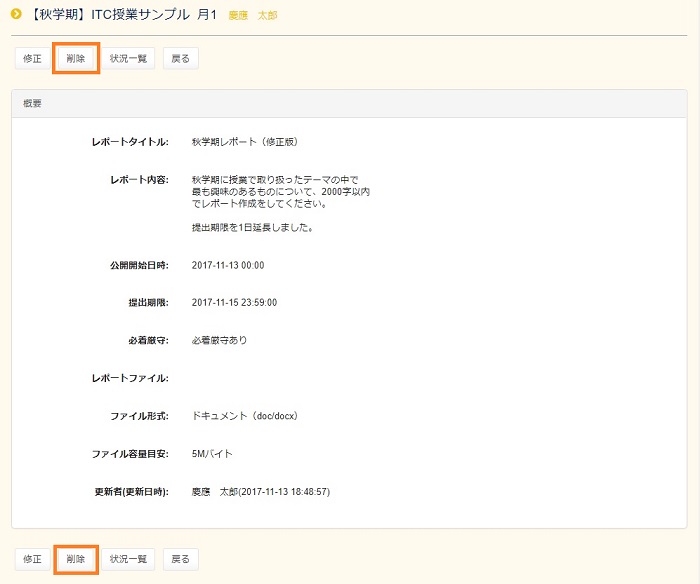
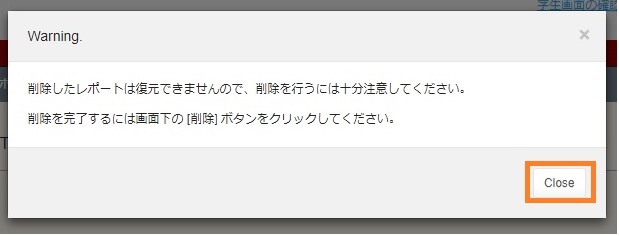
Since the Report details window opens, [delete] button under a window is clicked.
Since the message of the purport that data cannot be restored is displayed, [Close] is clicked.
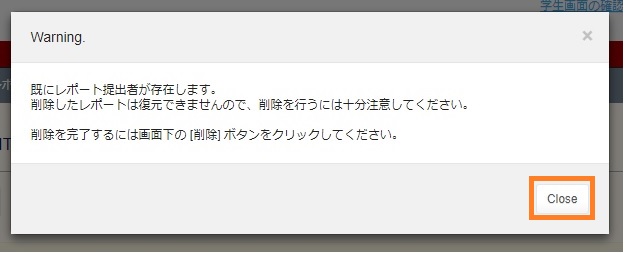
When there is already a presenter of a report at this time, it is displayed also that.
Since the Report deletion confirmation window opens, check the contents and click [delete] button at the lower left of a window.
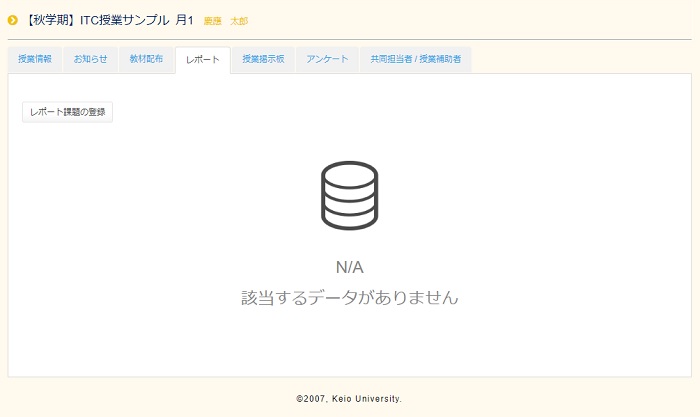
Check the report is deleted from the list.
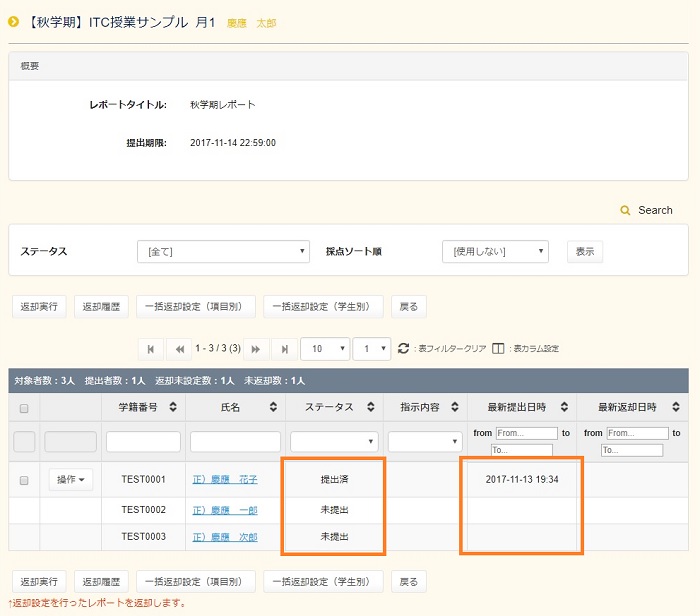
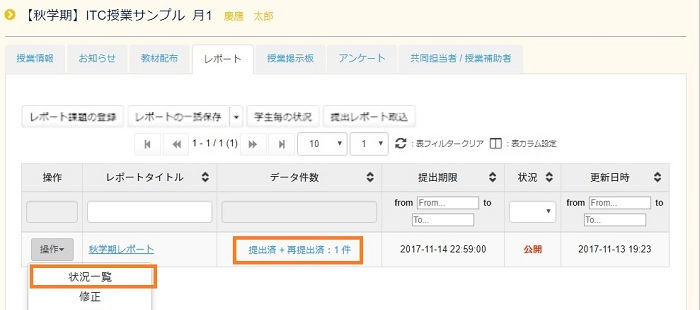
d. Checking the Submit Status
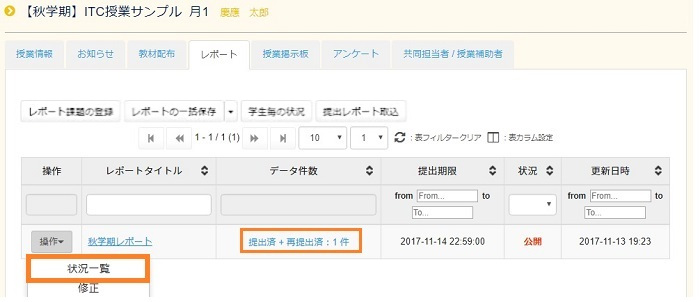
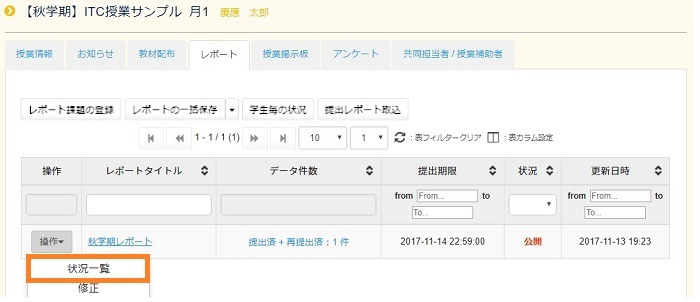
For confirming report submission of status, click [Operation] of the report that you want to confirm, and click [Status Overview] in the pull down menu. Or, for confirming student who submitted the report, click on link of [Number of data] colume in the table.
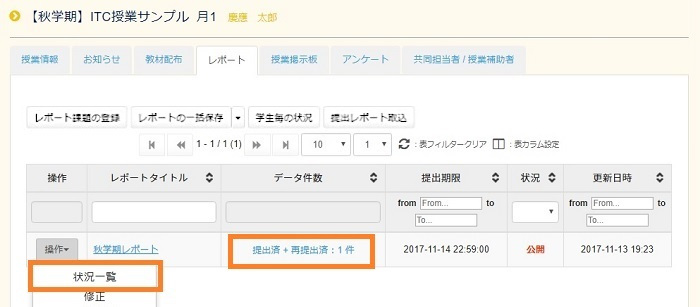
A page appears containing list that indicates the report status. The [Status] column and [Last submit date and time] column enable you to check the submittal status.
e. Verifying Submitted Reports
The procedures for verifying reports submitted by students are described below.
- Downloading and Verifying the Reports Submitted by Each Course Student
- Sending message that status of report to each students.
- Setting all report download conditions
- Download and Verify the Reports Submitted for Every Assignment
Downloading and Verifying the Reports Submitted by Each Course Student
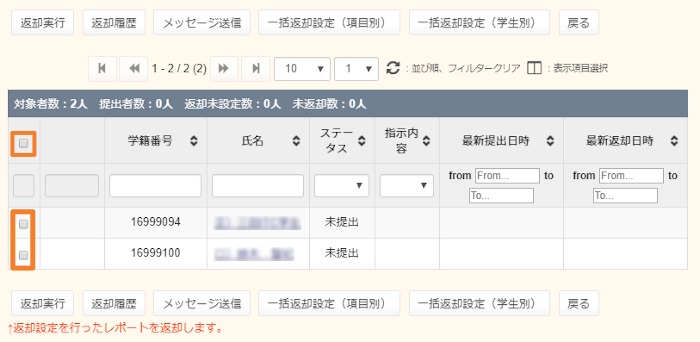
Click the [Status] that is displayed in the [Operation] box of the report you want to confirm. Or if you click number of data, [Status] is displayed.
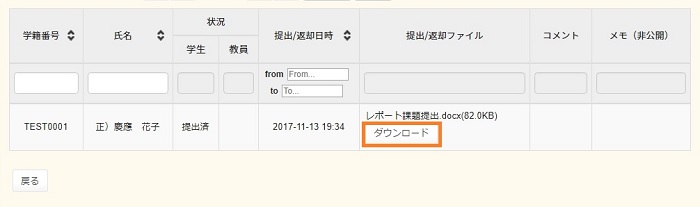
Click [Return History] to verify the report submitted by each course student.

By clicking [Download] which is displayed in the [submitted/returned file] box of the registered student for whom you wish to confirm the submitted contents, you can download them from the list.
The name of the downloaded file will be "01_report_P.zip", a compressed filename that does not indicate the identity of the course student. Generally, you can double-click the file to decompress it and view the submitted report. The system will automatically change the filename of the report to one of the following, regardless of the filename the student specified.
report_001_[student-ID]_[submission-date-and-time].[extension]
For example, if an individual whose student ID is "12345678" submits a report with a .doc extension on Jan. 15, 2010 at 16:55:30, the file name is as follows:
report_001_12345678_20100115165530.doc
Sending message that status of report to each students.
The report is possible to send messages to students by each status of report. Click on [Operation] of report title which you want to send message, and click on [Status Overview] in the pull-down menu.
[Report title] and [Submission deadline] are in the contents. And the [Status] and [Scoring order] are under of the contents, you can extract students by selecting items in those pull-down menus, and click on [Display] button.
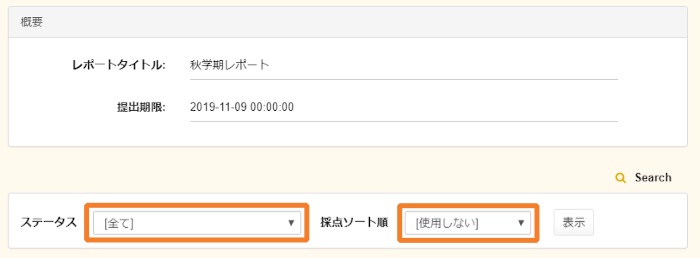
- [Status]
- ・[All]
- ・Waiting Submission [yet to submit/resubmit instruction]
- ・Waiting Submission [yet to submit]
- ・Waiting Submission [resubmit instruction]
- ・(Submission Complete)
- ・Receive
- [Scoring order]
- ・[non-use]
- ・[for Mita/Hiyoshi/Yagami]
- ・[for SFC]
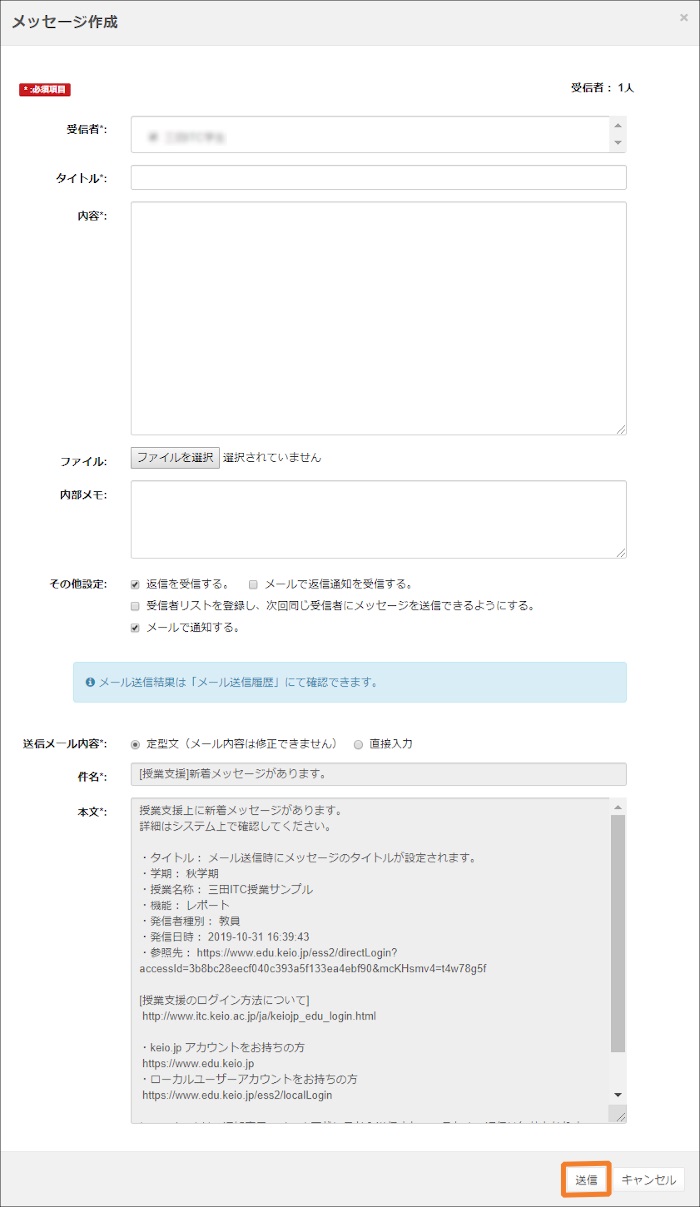
For sending message to all students who extracted, check the checkbox at the top of left. Or for sending message to some students, check the checkbox of each students that you want, and click on [Send Message] button.
”compose message” of forms displays, input text in each forms and check the checkboxes, click on [Send] button.
- [Recipient]
- It displays the student of area
- Title
- Input the report of title
- [Content]
- Input the content of message.
- [File]
- If you have data for report, you can send message with data.
- [Private memo]
- You can input own memo that concerned with message.
- other settings
- ・[Receive the reply message.] If you want reply message, check the checkbox of "Receive the reply message". And you also want to recieve E-mail, check the checkbox of "Receive the reply notification by e-mail".
- ・[Register the recipients list which is available when sending an message to the same recipients,] For sending message same recipients in many times, select the recipients list name. Messages are send to students in common course.
- ・[Notify recipient(s) by e-mail.] Check this checkbox for notify by e-mail. [Content], [Subject] and [Body] displays under this check item, and you can input title and body.
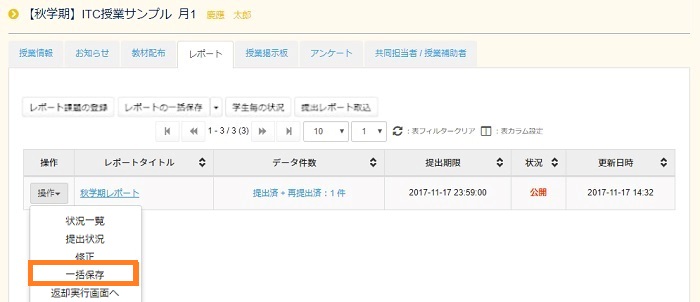
Setting all report download conditions
You can block download all reports by setting for each class.Click [Save report] displayed in the [Operation] box of the class for which you want to perform block download in [Report].
The download condition settings screen appears.
[Explanation of each item]
- [Selection of output]
- You can output only the last report submitted, or output all information.
If you have selected only the last report submitted, you can set the submission date and output the last report submitted since the date input. - [Output sequence]
- You can select to download in [Enrollment number sequence], [Mita/Hiyoshi/Yagami use sort sequence], or [Shonan Fujisawa use grading sort sequence].
- [Number of reports output to one directory]
- You can store reports that can be output in one folder by setting all reports, 10 reports, 20 reports, 30 reports, 40 reports, or 50 reports.
- [Character code selection]
- You can select either [Shift-JIS], [UTF-8], or [EUC_JP].
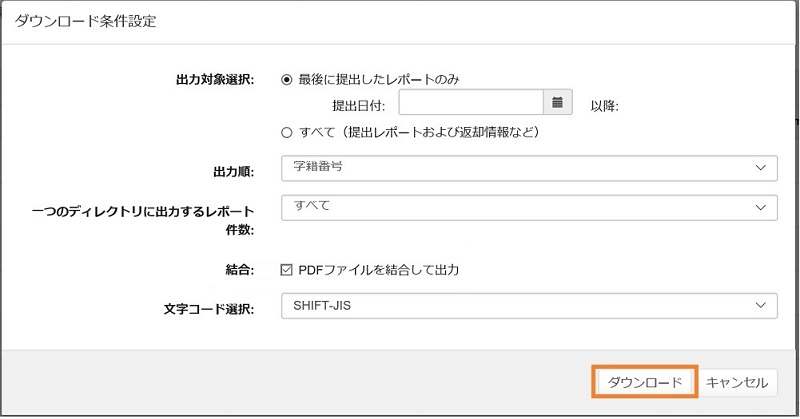
Click the [download] button at the above setting.
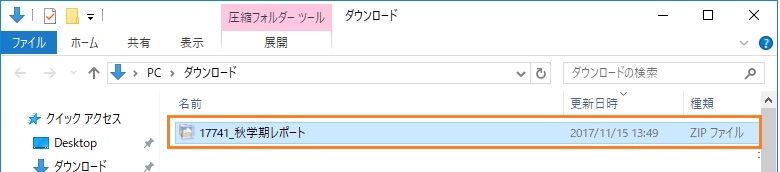
(Example): In the case of Internet Explorer, a save confirmation message is displayed at the bottom of the screen. This time click the [Save] button. The saved location is "Download Folder" if it is by default.

(Example): In the case of Internet Explorer, a download completion message is displayed. This time click "Open folder".
When open the folder, the file is downloaded in compressed state. Double-click the object compressed file.
Recommended software: Lhaplus
If you specified UTF-8 to download, it is necessary to extract it with UTF-8. Using an extraction tool whose character code can be specified, extract it by selecting UTF-8.
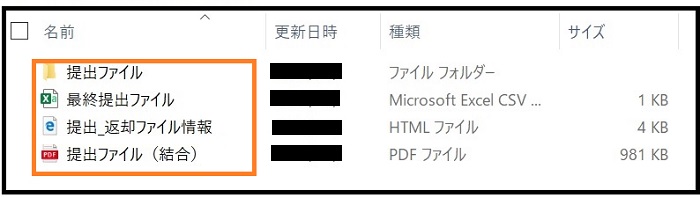
The file is extracted as follows.
- [Submitted file (folder)]
- Report files for which conditions were set are all saved.
When the condition setting, [Number of reports output to one directory] was set, the download is done with the number of reports attached to the folder name.
(Example) In the case of 120 students of a class, if 40 cases was set, folders divided into three parts as shown below are created and the reports are downloaded.
Folder names: 001-040, 041-080. 081-120 - [Final submitted file.csv]
- You can confirm the state of the final submission.
- [Submitted_returned file information.html]
- Submission and return information can be confirmed by an HTML format table. And you can save designated files.
- [Submitted_returned file history.csv] *Output when all were selected and downloaded.
- You can confirm the report submission-return history.
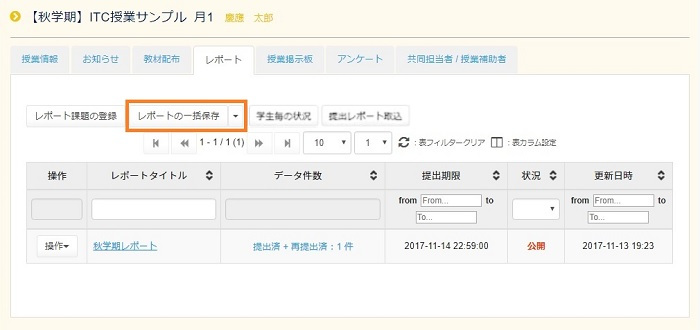
Download and Verify the Reports Submitted for Every Assignment
To download the submitted reports for all the assignments at one time, click [Save All Reports] in the upper-right corner of the Reports feature window. This operation can be operated only by the Instructor responsible
The name of the downloaded file will appear as "[Keio-ID-before-at-symbol].zip". The .zip extension indicates that it is a compressed file. Generally, you can double-click the file to view the file content.
- reportInfo.csv
Contains the overview per report. - [Report ID] Folder
Contains all the information for when you download all the reports submitted for an assignment at one time.
f. Notices to Course Students
You cannot specify the content of a notice to course students or send a notice until after the due date for a report has passed.
If you want to return the report in a block, see Report Common Return Setting.
You do not have to return reports to your students.
Click [Status] that is displayed in the [Operation] box of the assignment for which you wish to set notification.Or click the number of data.
Click [Return setting] from [Operation] box of registered students for which you want to set notification.
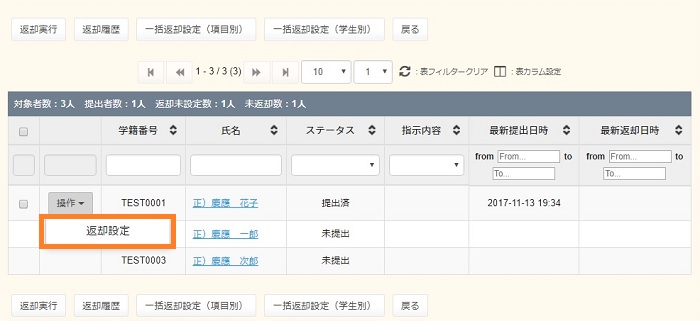
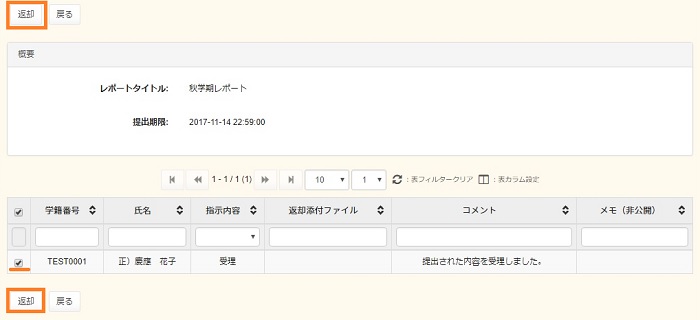
The page for specifying notice settings appears.
From the drop-down menu in [Result], select [Received] or [Resubmit] for the report they have submitted.
[Returned by] The person in charge of the class who makes the return setting can be specified in this function. This option is displayed when [Return setting] is enabled in the Advanced settings for Report registration.(When you set a teaching assistant as a person in charge of return, the person in charge of grading is displayed by default.)
If there is any data you want to return to the student, you can specify it in [Attachment to Return].
If you would like to send comments to the student, you can enter them in [Comments].
In [Notes], you can enter a note or other information about the submitted report. Students cannot view this field.
When you are finished, click [Register].
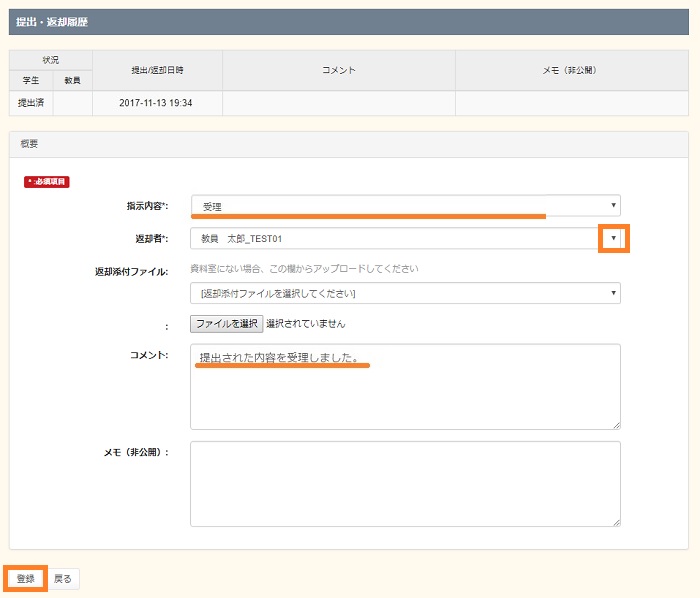
When the window to confirm registration appears, verify that the settings are correct, and then click [Register].
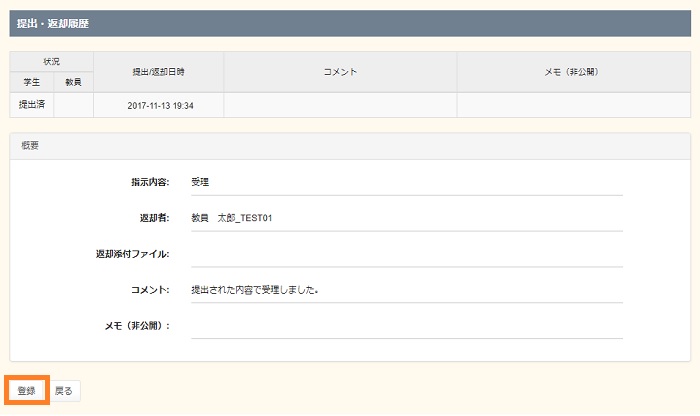
The page containing the report status list then appears. If "Return Settings Complete" is displayed in the [Status] column of the list, then the notice is ready to be sent.
However, at this point the notice has not yet been sent to the student.
To send the notice, click [Return].
Once you have finished specifying the return settings for a student, you are free to click [Return]. Likewise, you can click [Return] after you finish specifying the return settings for all course students.
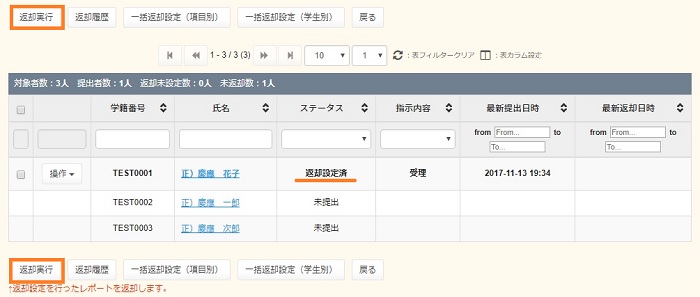
When the return execution confirmation screen is displayed, check it to make sure the contents are correct, and click [Return].A report return confirmation message will be displayed, so click [Return].
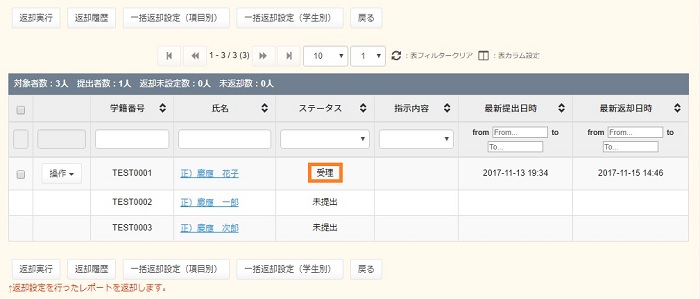
The page containing the report status list then appears. Finally, confirm that "Returned" is displayed in the [Status] column of the list.
g. Import Reports
You can import reports that students submitted in paper, and delete and modify data that were imported in "Import Reports".
Import Report
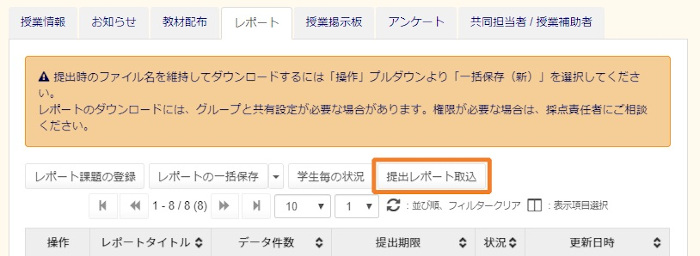
- After you selected course, click on [Report] tab.
-
Click on [Import Report(s)] button in the upper of table.
-
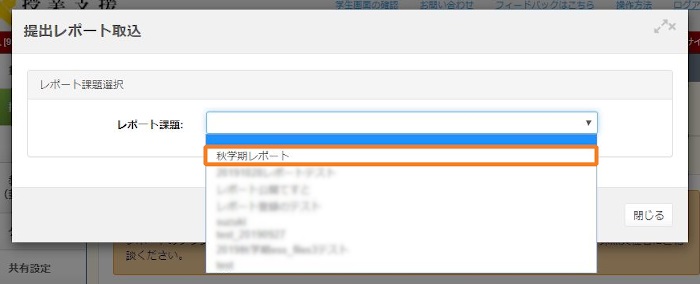
[Import Report(s)] displays, select title name in the title of pull down menu.
-
Report of detail information displays. Refer ZIP file you made in [ファイルを選択] button, click on [Preview] button.
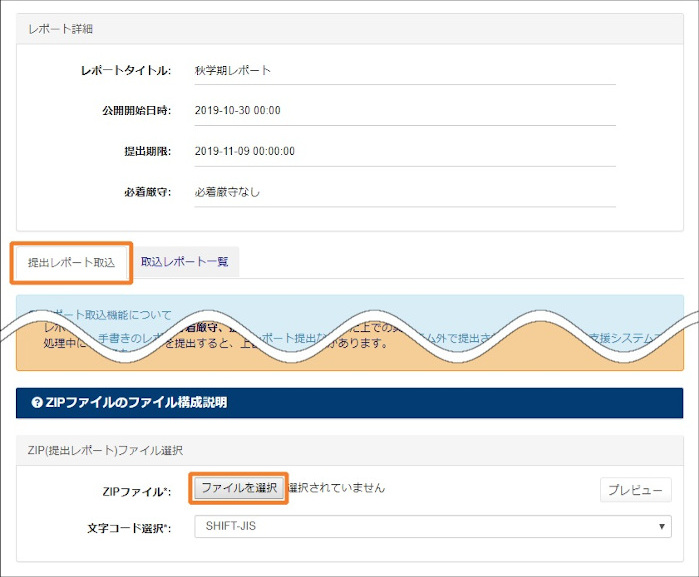
In addition, ZIP file of name is freedom, you can name it freely. About attention of files which you make ZIP file, refer to the below table.File name Description studentList.csv This is a list of student number which students submitted. This file name is necessarily “studentList.csv”, and the other names are not permitted.
For example: If students numbers are “12345678” and “12345679”, the first line start in student number and break line at the end of number. Every student numbers have to be breaked line in one student number as the following.
12345678
12345679
※In CSV file, the header line is not needed in the first line.Report file Report of name is student number, and also type the other student numbers in studentList.csv.
And you can name like the following file names by using character "_" at the end of file name.
For example: If students numbers are "12345678" and "12345679", file name are the following.
12345678.txt
12345678_1.txt
12345678_2.txt
12345679.txt
- After you see preview, click on [Register] button.
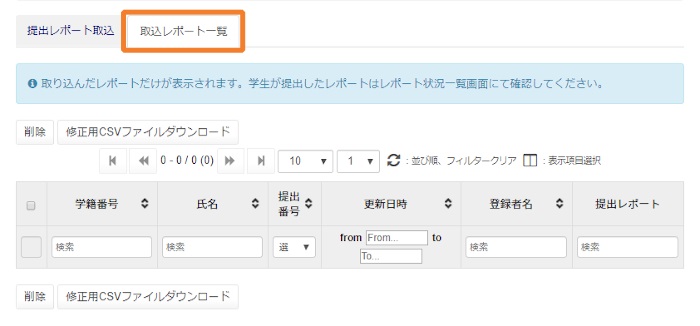
List
You make sure the report of situation which you imported in [List]. You can delete report by choosing report in the list., and edit by using CSV file.
- Carry out [Import Report] of step from 1 to 3.
-
Click on [List] tab at the next of [Import Report(s)] tab.
Delete imported report.
- Click on the check box of student name that you want to delete.
- Click on the [Delete] button on the table.
Download CSV file for modifying.
- Click on the check box of student name that you want to modify.
- Click on [Download the update .csv]
-
CSV file download, it contains information of student number, report number, teacher number which register student.
※A CSV file is downloaded. The student number, report number, and teacher number that registered the student information are included in it.
Modify imported report
- Download CSV file for modifying.
- Save [studentList.csv] and [student number.extension](e.g. 12345678.txt) to a ZIP file.
- Import a Zip file by tab.
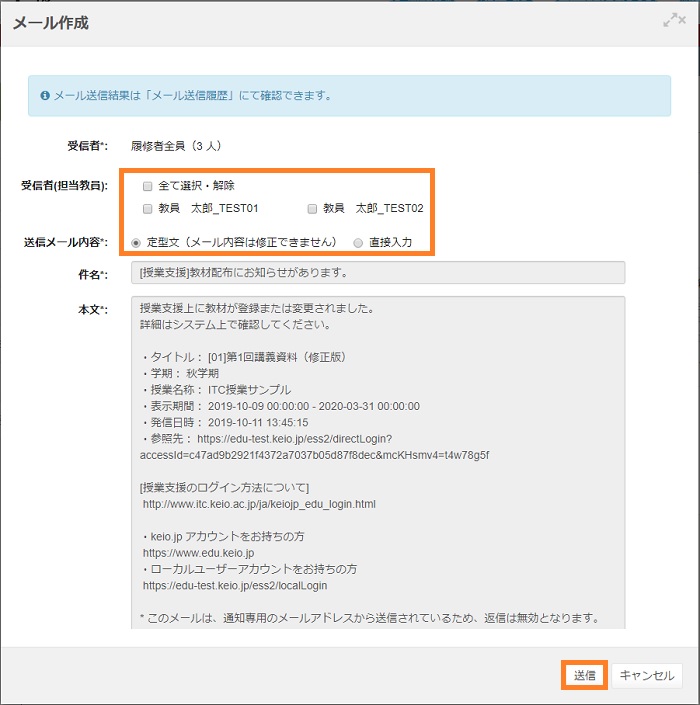
i. Send Mail
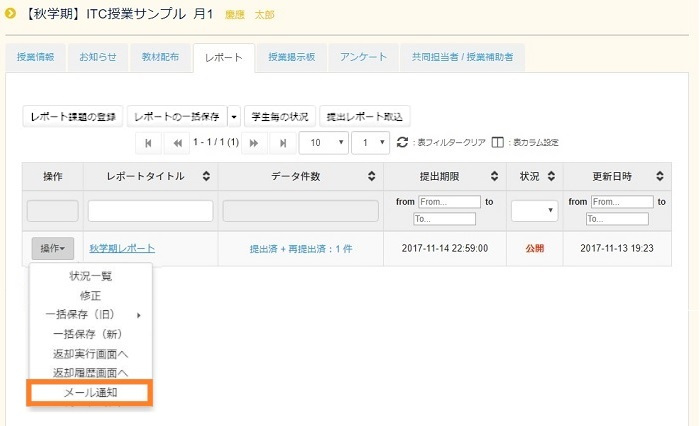
When you send massage about report that you want to use, click on [Mail Send] in the [Operation] of pull-down menu.
"New" window display, check each menus and input text in form. Click on [Send] buttom. For more informaiton, seethe email notification feature.
Last-Modified: December 7, 2020
The content ends at this position.